
The Google Ads Campaign Workflow — Just 7 Steps
After the history of Google advertising and ad placements, the groundwork is done — you know where ads show; next, pick a suitable goal and launch. This article covers the full campaign workflow. Most content premieres on my WeChat account: Nolan聊.
Table of contents
Workflow overview:
1. Create the ad account
Confirm the account type and details (basic vs professional ad accounts — generally choose professional).
2. Create the campaign
- Set the campaign goal
- Choose the campaign type
- Choose placements and audience targeting
- Set budget and schedule
- Create ad groups
3. Create the ad group
- Write headlines and descriptions
- Add images or video
- Set the landing page
- Choose keywords
4. Set delivery
- Choose channels and display formats
- Set bids and bidding strategy
5. Set budget and schedule
6. Upload creative
Confirm the specs and formats, and design to platform requirements.
7. Submit for review
Confirm the content and creative comply with Google Ads policies.
8. Track and optimize
- Continuously track performance and conversion data
- Adjust campaigns, groups or bids based on the data
- Keep running A/B tests on creative and copy
9. Notes
- Know your audience; pick suitable campaign types, placements, keywords and interest tags.
- Set sensible budgets and schedules so campaigns keep serving at full effect.
- Follow platform policy: no fraud, scams or infringement in content, creative or landing pages.
- Track performance continuously and optimize promptly.
Case study — a display campaign in detail
Using a display (DM) campaign as the example.
1. New campaign
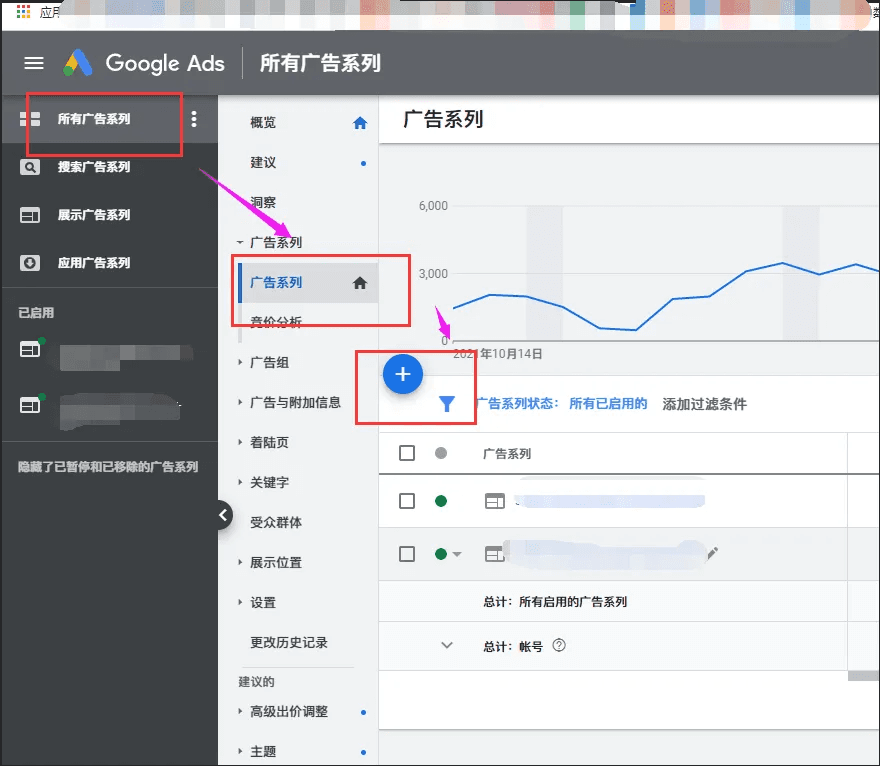
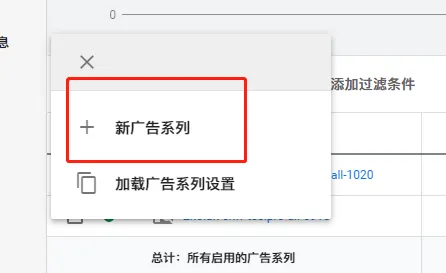
Click All campaigns → the + button → add a new campaign.
2. Goal
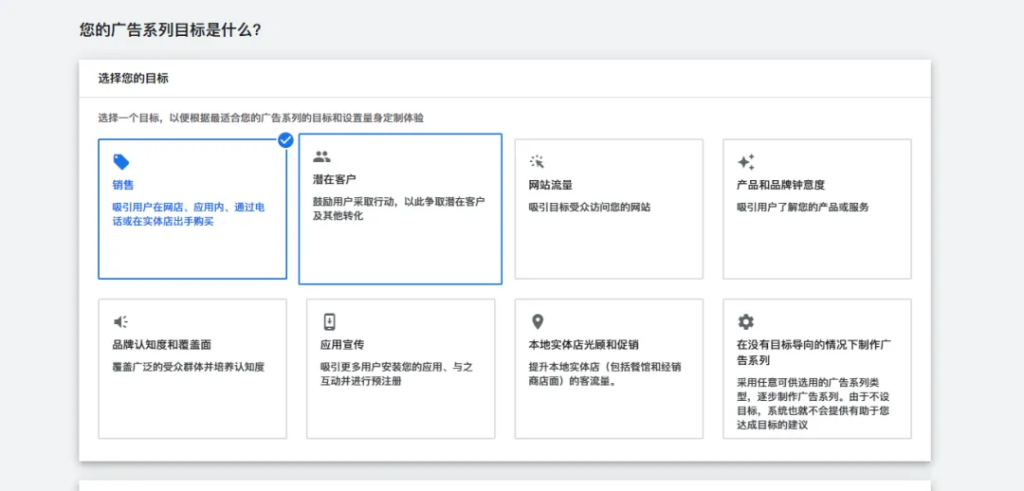
Choose Sales, or run without goal guidance.
3. Campaign type
For display campaigns, choose Display.
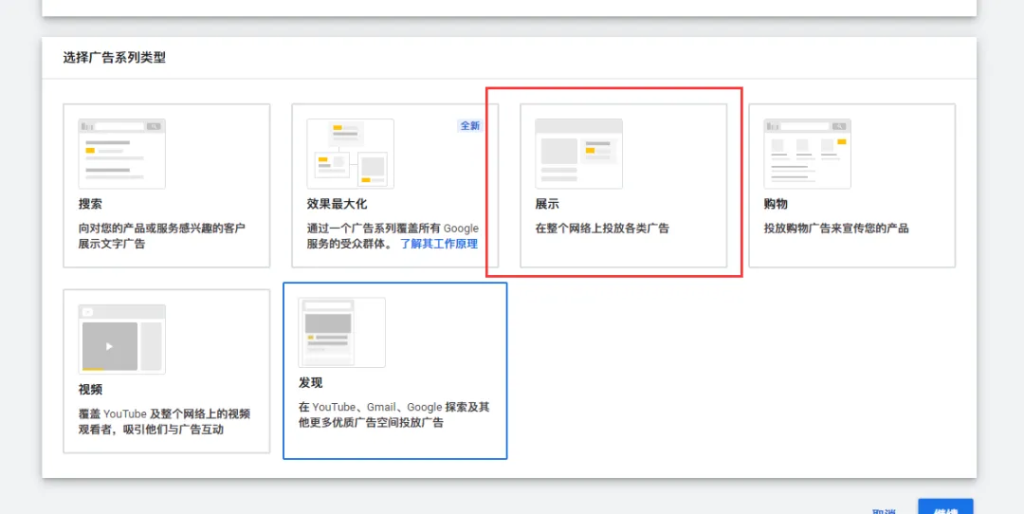
4. Display sub-type
Enter your domain and campaign name (see the basic-settings guide for details).
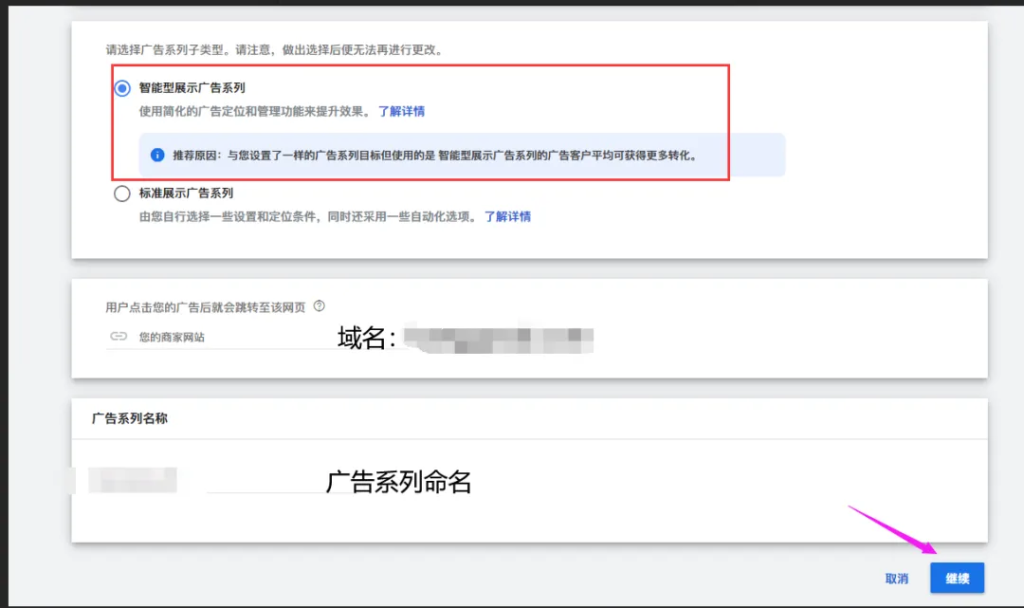
No specific audience requirements → Smart display campaign.
Clear target audience → Standard display campaign.
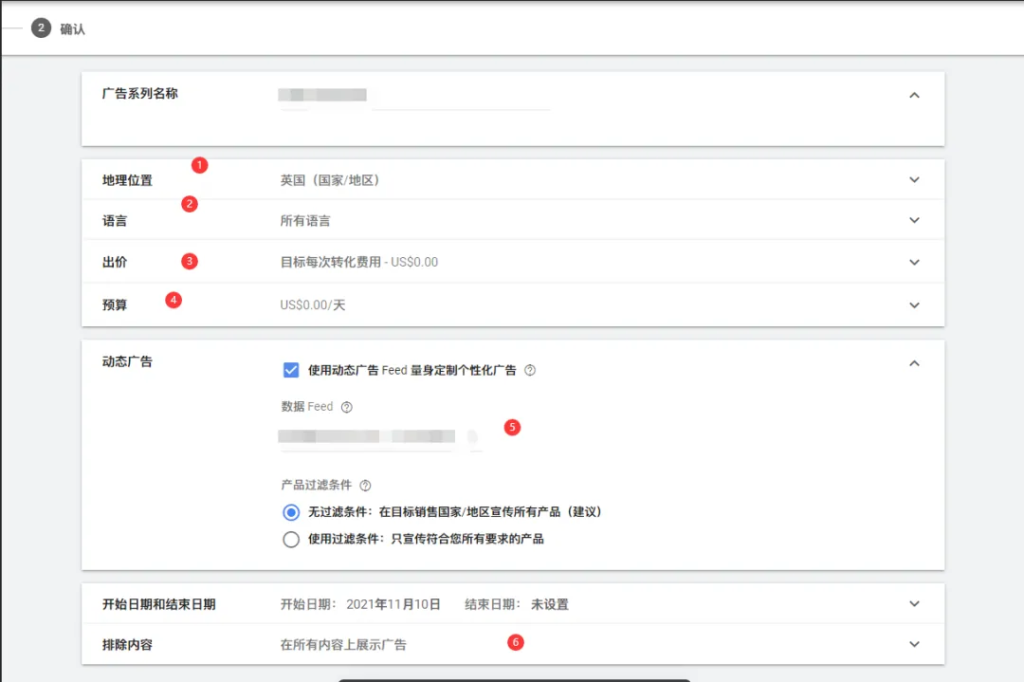
5. Basic settings
Items ①②④⑥ in the panel: adjust per campaign needs.
③ Bid strategy: tCPA, tROAS, max conversions — choose per your strategy; see Google's help center for each strategy's positioning.
⑤ Feed: choose from the feeds you've built — provided you created and linked them in GMC beforehand.
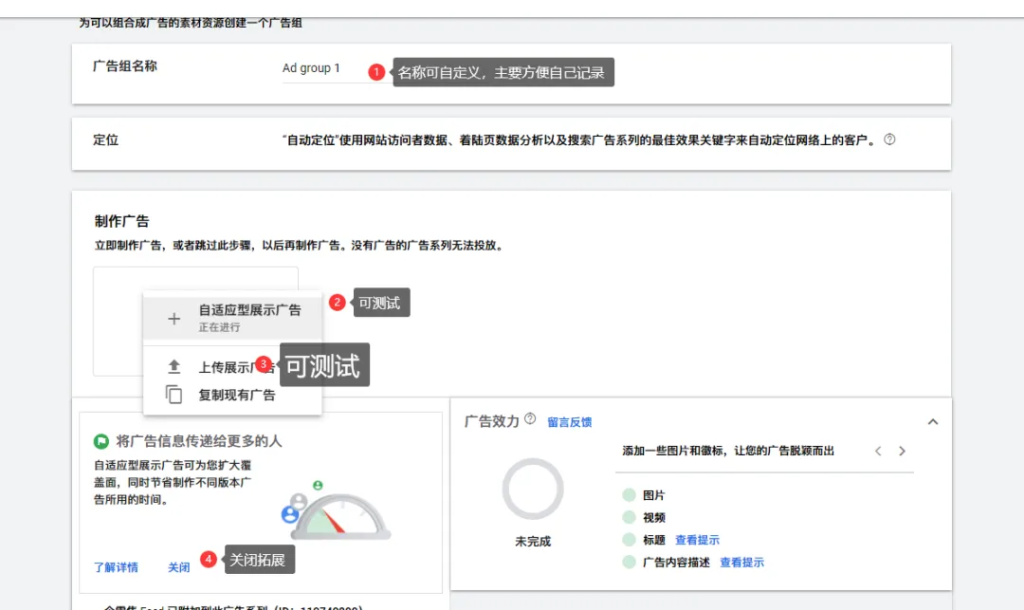
6. Ad group settings
① Name it however aids your record-keeping.
② Responsive display ads: need image, video and text assets; they auto-fit every ad size and slot.
③ Standard display ads: images only; they can only match slots of the same size.
④ Google's audience auto-expansion toggle: off means no automatic audience broadening.
7. Ad settings
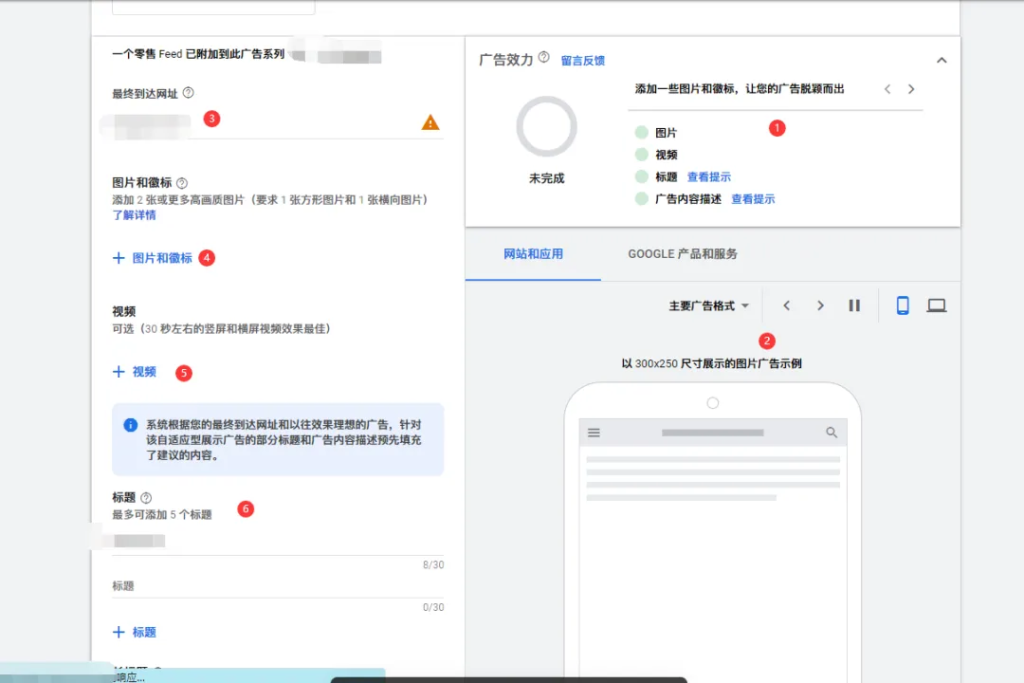
Panel one
① Judge quality from the ad content: aim for "Good" or better.
② Auto-generated previews from your assets: use them to see how the ad actually renders.
③④⑤⑥ Fill in per asset requirements, ideally following platform suggestions.
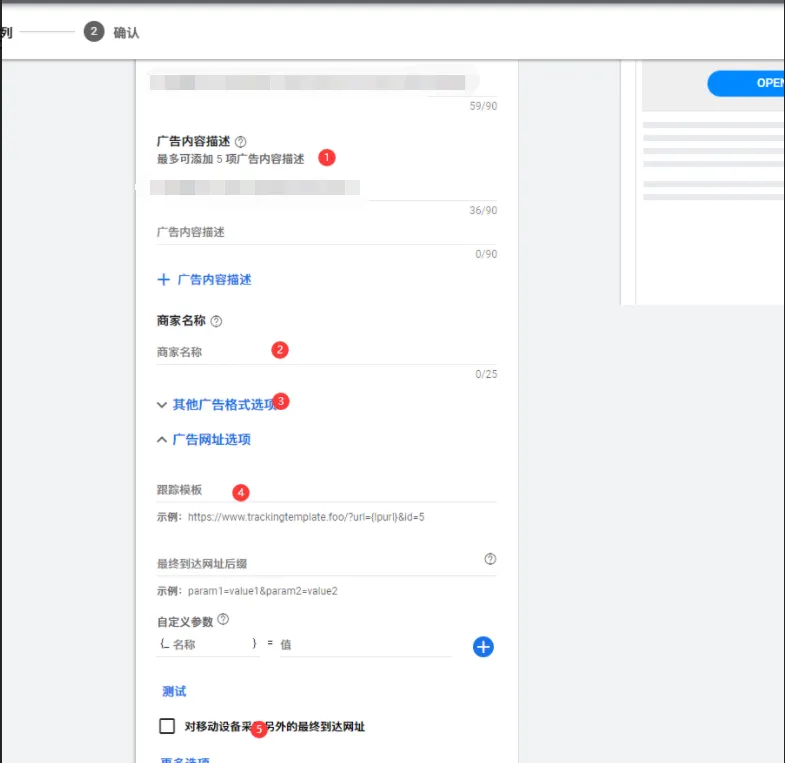
Panel two
① Fill per asset requirements, ideally following platform suggestions.
② Name freely per your campaign goal.
③ Optional, choose per campaign needs.
④ Optional — but the campaign must have tracking somewhere.
Note: tracking resolves to the smallest tracked unit. Priority decreases from ad → ad group → campaign; the highest-priority code present wins.
Example: a campaign structured as follows
Campaign A (tracking code A)
- Ad group a (tracking code a)
- Ad 1 (tracking code 1)
- Ad 2
- Ad 3
- Ad group b
- Ad 4
Case 1: a conversion from Ad 1 reports tracking code 1.
Case 2: a conversion from Ad 2 reports ad group a's code a.
Case 3: a conversion from Ad 4 reports campaign A's code A.
⑤ Add a mobile page URL if needed.
That completes the ad group configuration — save, and the campaign is built. Add more groups as needed; Google officially recommends 3+ ad groups per campaign for better results.
FAQ
- How many steps does a Google Ads launch take?
- Seven core steps: create the ad account, create the campaign, create the ad group, set delivery, set budget and schedule, upload creative, submit for review — then continuously track performance and optimize against the data.
- What should I watch out for when running Google ads?
- Three things: know your audience and pick the right campaign type, placements and keywords; set a sensible budget and schedule so the ads keep serving; and strictly follow Google's ad policies — creative and landing pages must be free of fraud, infringement or other violations, or you risk disapproval and account bans.